Paper plate crafts are always popular, but we must warn you that this paper plate horse is slightly trickier than most of the paper plate crafts at Activity Village! Younger children will need help drawing and cutting the head and leg shapes, and perhaps with some of the sticking too. But we think the lovely end result is worth it!
You will need:
Brown paint
2 paper plates
Black pen
Glue
Instructions:
Paint the plates brown and leave to dry. (For younger children you might want to do this in advance).
Fold both plates in half. One is the body - put this to one side.
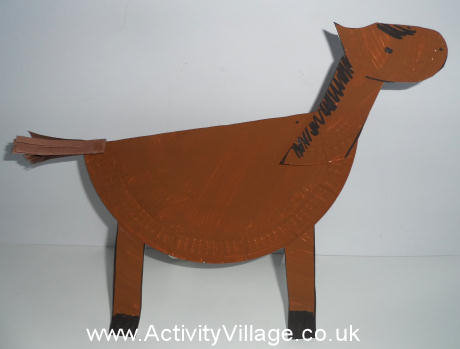
On the other plate draw a neck and face so that the nose sits along the fold and two legs. See the picture below for guidance.
Cut out the head and draw on the mane and eyes.
Glue the ends of the neck along the fold of the body plate.
Cut out the legs, cutting along the fold so that you have four. Draw on hooves. Glue the legs around the rim of the body plate.
Cut strips from the scraps of the second plate for the tail and glue on to the body.
NB: Our paper plate horse stood up with careful placement of the legs but for young children make a hole along the fold on the body, thread through some wool and hang up your horse.


