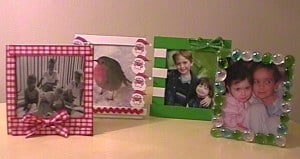
Grandparents, aunties and uncles and godparents always love to get photos of their favourite children. Nice frames can be expensive to buy and impersonal too. Why not get your children to help you create some frames with bits and pieces you have lying around your house? You will all have great fun doing it and will produce fun little frames that will be especially treasured because the kids had a hand in making them. Be warned this idea is addictive!
You will need:
Empty CD boxes
Scissors and glue
Craft supplies and household bits and pieces (see suggestions below)
We always seem to have empty CD boxes lying around and if you dont, you can buy them very cheaply at computer or record stores.
Instructions:
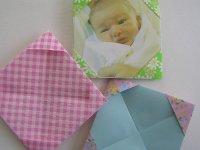
Open your CD box and take out the paper inserts and the molded plastic piece into which the CD itself fits.
Cut your photo to just smaller than the box. You will be fitting it into the back of the box with the hinged edge at the top, so about 4 inches wide and 4 ¾ inches high is perfect, but dont worry too much! Fix the photo against the plastic with a few small pieces of sticky-tape. Find a nice piece of cardboard, gift wrap or fun foam which will complement your design and cut this to fit snugly behind the photo and to the edges of the frame (4 ¾ inches wide, 5 ¼ inches high). Fix with glue or sticky-tape with the pattern, if any, facing into the box. When your frame is finished you will open the box out to stand it up, so this backing protects your photo.
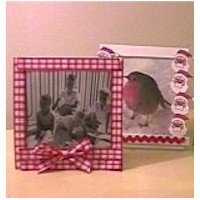
Now all you need to do is draw a line of glue on the outside edges of the front of the CD box and start decorating! Use whatever you have to hand. You can build on the theme of the photo, the season, or the particular interests of the recipient. Our examples above are obviously on a Christmas theme.
Artwork instead of a photo
Another idea is to use some artwork which the children have created instead of a photo, and surround it with something which complements the work. Get a little one to write I Love You Granny in their best writing and then stick on their own choice of stickers and beads, and you will have created a present which will be treasured forever!
Here are some decorating ideas to get you started:
For photos of girls:
- Sparkly beads either individual or pre-strung necklaces
- Pearl beads (you may be able to buy an old pearl necklace in a charity shop cheaply)
- Jewels (available from craft shops)
- Glass nuggets (for flower arranging, they come in gorgeous colours)
- Tiny silk flowers
- Pretty flower braid, with the individual flowers cut apart and interspersed with silk leaves or green ribbon
- Tiny Barbie figures (fast food give-always)
- Left over or odd dolls shoes and accessories
For photos of boys:
- Jelly beans
- Tiny plastic soldiers
- Tiny cars
- Wheels of assorted shapes and sizes!
- Lego pieces. This looks great!
- Peanuts in shells
- Toy insects, plastic dinosaurs or farm animals
- Stamps (buy a collectors pack of football stamps, for example)
- Left-over or odd action man accessories shoes, boots, helmets
For Christmas
- Tinsel
- Little cut-outs of Christmassy things, from wrapping paper or old cards (or have a look at our scrapbook paper
- Small ornaments or bits of ornaments left over from a wreath
- Little ribbon bows
- Fake holly and berries
- Gold stars either stickers, or shapes cut from cardboard
- Gold and silver beads, or metallic beads in Christmas colours
- Red or green gingham ribbon
- Christmas shapes (trees are easiest!) cut out of craft foam
- Dried cranberries
- Spices (cloves, star anise, cinnamon sticks). This one smells nice too!
- Tiny pine cones
- Glitter lots of it, with some sequins thrown in for good measure. This is fun to do but can be messy to display: no matter how well the glitter is stuck on, it will always find its way off the frame again!
- Gold and silver braid and ribbons
- Fake spruce
- Miniature wrapped-up presents make your own, or buy miniature tree decorations
- Cotton wool for a snow scene
- Small squares cut from last years Christmas cards. Cut them carefully to include the right colours and you will get a lovely mosaic effect
Seasonal:
For spring
- Little white daisies cut out of craft foam, braid etc
- Tulip shapes from craft foam
- Easter egg shapes from craft foam
- Yellow or lime green gingham ribbons
- Rickrack braid in spring colours
- Strips of fake grass! (sometimes you can beg this from an old-fashioned greengrocer)
For summer
- Ribbon and rickrack braid in summer colours
- Little silk flowers in summer colours
- Tiny plastic toys
- Bright foam shapes create some yellow smiley faces with black pen, perhaps, or cut out some ice-cream cones
- Corks(an adult can cut these in half length-wise if preferred)
- Driftwood
- Shells
- Sand (stick on thickly like glitter, perhaps in two layers)
- Strips of cork cut from a cork floor tile
For autumn
- Autumn leaves
- Conkers
- Orange and yellow rickrack braid
- Tiny pine cones or acorns or nuts (brazil nuts work well)
For winter
- Cotton wool
- Silver glitter and sequins
- White pearly buttons
- White feather edging (from craft shops)
- White snowflake shapes cut from paper doilies (you may want to put down an edging of dark blue paper or fun foam first
General
- Buttons
- Small fabric squares cut out with pinking shears for a patchwork effect
- Jelly beans in bright colours (warn children not to try to eat them once they have been stuck on
- Bright paper shapes (you can buy these pre-cut or make your own)
- Squares, rectangles and triangles cut out of fun foam or felt
- Feather edging (be careful: lots of people have allergies to feathers!)
- Mini pompoms (this one is not cheap but children love it!
- Bright stickers
- Bottle tops
- Beads and sequins
- Tiny toys (fast food toys, small plastic animals or insects). You may be able to pick up a complete dolls house set or farm set in a dollar store
- Pretend coins (or loose change!)
- Pasta pieces leave them plain or paint them first for even more fun!
- Golf tees
- Corks
- Lolly sticks plain or coloured
- Nuts and bolts, washers or raw plugs, scraps of electrical wire or a mélange of tool-box scraps!
- Old jigsaw pieces
- li>Counters or gambling chips
- Dice (again not a cheap option, but great fun)
- Plastic straws
- Plastic picnic cutlery
- Mosaic tiles (start in the centre of the row and work out)
- Old teaspoons
- Stamps
- Pipe-cleaners (tick them on straight or coil them into shapes first)
- Paper cut-outs from gift wrap, magazines, old cards etc (or have a look at our scrapbook paper for ideas)
- Pieces of coloured raffia
- String - all sorts of possibilities here!
- Sewing supplies scraps of braid or ribbon, a thimble, safety pins, part of an old cloth tape measure (or find a little sewing set cheaply in a dollar store)
- Bright plastic clothes pegs
- Cheap toothbrushes or combs!
- Old colouring pencils or brand new crayons. This looks very cheerful and is especially good for framing artwork
- Office supplies rubber bands, paper clips, pencils, a pencil sharpener
- Old game pieces perhaps scrabble, mah-jong or bingo pieces from an ancient set, or one found in a junk shop or charity shop. This is very effective.
- Childrens magnetic letters
- Strips of corrugated paper or card
Valentines Day, or for those you love!
- Small red or pink hearts wooden or cardboard shapes, or stickers
- Loveheart sweets
- Heart buttons and beads
- Red or pink ribbons and bows
- Pink or red feather edging
Birthdays
- Birthday cake candles
- Mosaic-sized pieces of old birthday cards
- Small boxes (or pieces of sponge) wrapped as presents
- Cut-outs from gift wrap
- Birthday ribbons
- Small brightly-coloured balloons (not inflated!)
- Balloon shapes cut out of craft foam
- Any of the above with an its my birthday! badge in one corner