All About Rangoli, and Rangoli Crafts For Kids

A rangoli is a colourful design made on the floor near the entrance to a house to welcome guests.
At Diwali, Hindus draw bright Rangoli patterns to encourage the goddess
Lakshmi to enter their homes. Here at Activity Village you can learn about
rangoli by looking at photos and videos, print out some rangoli colouring pages for a simple colouring activity,
try out some rangoli fuse bead patterns as a quick and non-messy craft idea, or have a go at some of our more
extensive craft projects, which take you through designing and creating rangoli of your own with many different
ingredients. Find out all about rangoli and explore our rangoli crafts below...

Colour in a picture of a little girl and her rangoli design
Diwali Colouring Pages

18 beautiful rangoli designs to use for colouring or in crafts
Rangoli Colouring Pages

Diwali Fuse Bead Patterns
All About Rangoli
Rangoli patterns are traditionally drawn with the fingers using flour, rice grains or coloured chalk.
Rangoli can be square, rectangular or circular – or a mix of all three. They are often symmetrical. Rangoli motifs are usually taken from Nature -
peacocks, swans, mango, flowers and so on.
Rangoli were originally done in small patterns of about 2 foot square, but now entire areas of floor can be covered in intricate
designs, often produced by first drawing gridlines in light chalk.
We have a number of suggestions below for creating Rangoli designs, suitable for children of all ages and abilities.
Rangoli examples
Rangoli come in all shapes and sizes! Before you make your own it is a good idea to have a look at a variety of different examples
- perhaps you could print some out to look at with your children or sit at the computer together.

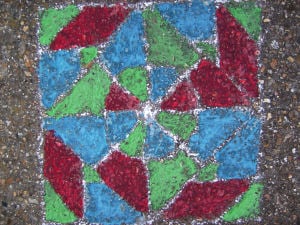
Simple rangoli design drawn with rice powder in the dirt

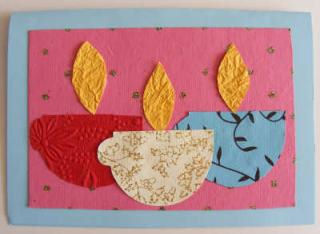
Rangoli design with diya in centre

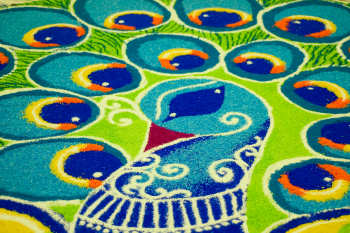
Peacock rangoli design
Please note that the following examples are outside Activity Village:
Example: beautiful collection of designs done by children in a New Zealand school
Example: this rangoli design features the traditional diva lamp in its centre
Example: wonderful collection of rangoli designs
Example: this beautiful rangoli has been made with flower petals
Example: here is a rangoli pattern made by a Year 3 class in Norfolk
Creating your own rangoli
1. Decide on your design
The examples above may have inspired your children to create their own design - or they may need extra help. Talk about how the
designs are usually symmetrical and geometric. Examine the sort of motifs, symbols and colours used in the examples above.
For younger children, it may be best for you to draw the outline of a simple design and ask the children to colour it in.
Older children can draw their own outline freehand, or use one of our grid papers to create a design.
The advantage of using a grid paper is that the design can then easily be transferred onto a larger surface.
Example 1: some fantastic grid designs to inspire you.
Example 2: more grid designs

Alternatively, use one of our Rangoli colouring pages for inspiration or to trace.
2. Decide on your medium and surface
a) Chalk Rangoli
Even the youngest children will enjoy creating their own chalk rangoli designs.
First, use a white chalk to outline your patterns, or to draw dots to form a grid. Then use coloured chalks or poster paint to fill in the design.
You will need:
Black paper (or sandpaper - see below)
Chalk
Ruler
Use your ruler to draw out a grid of dots. These can be as close together (to make the design intricate) or as far apart (for more simple
designs) as you like. We used a grid 15cm by 15cm with 3 cm intervals.
Now draw on your design with the chalk (you could try sketching out your design first on our grid paper). Look at our
examples for inspiration. Younger children may need a design drawn for them to colour.
Use coloured chalks to colour in the design.

Chalk rangoli pictures like these have the added advantage that you can display and save your child's creation longer than the first rain!
You can also use sandpaper instead of black paper. The picture is less liable to smudge and should last longer, and it feels more like colouring onto the pavement outside!
Outdoor Rangoli
You will need:
Chalk
Food colouring (in a number of colours)
Plain flour
Long rule
Thick paint brush
Area of yard or garden path
Use your ruler to draw out a grid of dots, as close together (for intricate designs) or as far apart as you like. In our outdoor rangoli, we used a grid
50cm by 50cm with 5cm intervals.
Now draw on your design with the chalk (perhaps sketching it out first on our grid paper).
As before, younger children may need a design drawn for them to colour.
Mix together half a cup of flour with a few drops of food colouring and a little water until it forms a paste about the texture of PVA
(white) glue. Repeat for each colour of food colouring that you are using. Use your pastes to paint your design.
Note: this will stain the path for quite a while (perhaps permanently) so make sure you have permission first! You may want to paint your design onto a large, movable paving
stone instead of directly onto the ground.

Jack's design drawn with chalk on the driveway

Jack painting his rangoli design

Jack's finished rangoli - beautiful!
b) Coloured sand or salt rangoli
It is now possible to purchase coloured sand (used mainly for creating layered bottle designs). Alternatively, add food
colouring to salt, spread thin and allow to dry out.
In traditional rangoli, the outline pattern is drawn on the floor and then filled in by carefully sprinkling coloured powders. Older
children could try this technique directly on the ground with coloured sand or salt, having drawn their outline with chalk. Make sure they try this
somewhere away from too much foot traffic, and easy to clean!
You may prefer to draw your outline on a piece of dark coloured paper and then fill in each section with white glue, sprinkling
with sand or salt as you would with glitter. Do one colour at a time and shake the excess off onto a large piece of newspaper.
Children could use glitter in some areas of the design for contrast and emphasis.

Rangoli diya design with coloured rice
c) Lentils and other pulses
Follow the link below to see an example of children using lentils and other colourful materials to
create rangoli designs.

Rangoli of the goddess Lakshmi made with dal, coloured rice and dried petals

This beautiful butterfly rangoli has been created using flower petals on grass!
d) Colouring pencils/pens
Children will enjoy colouring many of the patterns linked to below, as well as creating their
own rangoli patterns with grid paper then colouring in.
Older children can outline parts of a completed rangoli with gold or silver pens or gel pens for a more exotic, sparkly look.
Outline patterns
Example 1
Example 2 (Rangoli colouring page from Crayola)
Example 3: floral design
Example 4: a selection of pretty designs for inspiration or to colour
Example 5: some exotic designs
Example 6: a pretty pattern
Other Rangoli Ideas and Links
Wonderful rangoli art by children at a school in New Dehli
Paper plate variation: Scroll down to see how some Year 3 children created rangoli-type designs using paper plates and colourful pulses - a selection
of these would make a beautiful display.
Computer generated rangoli: Try colouring some rangoli patterns on your computer!
Simple grid designs: This excellent page has some simple grid designs which can be drawn with one continuous hand movement - which is how traditional rangoli are created in
Here is a presentation about rangoli which might help you get started in designing your own.
You might also enjoy:

Diwali Crafts
We have many original Diwali craft ideas, including ideas for creating your own
diya and rangoli.
Back to Diwali for Kids
Back to Holiday Pages
|